Are you managing a model from a developing country? Is her phone’s camera subpar? Are the places where she takes photos poorly lit? Are the backgrounds too busy and distracting? It’s time to take control and elevate the quality of their photos with simple but powerful post-production techniques.
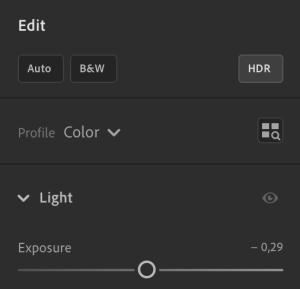
If you’re like me and already paying $10/month for Adobe Photoshop, you’re in luck—Lightroom is included in the package. Lightroom is a professional-grade tool used by photographers worldwide, and while it might seem intimidating at first, don’t worry. We’re keeping it simple. You only need to master four key settings: Auto, HDR, Exposure, and Background Blur.
Step 1: AUTO – Let Lightroom Work Its Magic
The Auto function is your lifesaver. By selecting this, Lightroom automatically balances light, shadows, and colors, essentially fixing the most glaring issues in the photo. Think of it as a one-click solution for basic corrections. Magic, right?
Step 2: HDR – Boost the Photo’s Range
HDR enhances the photo’s dynamic range, adding depth and vibrancy. You don’t need to be a photography expert for this—just tap the button and decide if you like the results.

Step 3: EXPOSURE – Adjust the Lighting
The exposure setting is all about tweaking the overall brightness. Simply slide the dial until the photo looks right to you. Personally, I prefer leaving my images slightly overexposed, as it adds a bright, professional touch.
Step 4: BACKGROUND BLUR – Simulate Pro-Level Focus
A blurred background can work wonders. It mimics the effect of professional cameras, making your photos look more polished. More importantly, it draws attention to the model and removes focus from any distracting objects in the background.
Bonus Tip: Erase Unwanted Objects
Lightroom’s AI-powered erase tool is a game-changer. Whether it’s a cluttered item or an unwanted shadow, this tool can seamlessly remove distractions from the frame. It requires a bit more patience than the other settings, but the results are worth it.
Additional Tricks: Reframe and Crop
Use Lightroom’s crop and reframe tools to remove empty spaces or awkward edges. A tighter frame can enhance the visual impact of the photo and focus attention where it matters most.
Batch Processing for Speed
The best part? Lightroom allows you to apply these adjustments to multiple photos at once. With batch editing, you can transform 30 photos and export them in under 30 minutes—perfect for models who need quick but high-quality updates for their profiles.
With these easy-to-use features, you can turn even the most basic photos into professional-looking images. Whether your model is working with limited resources or just needs a little polish, Lightroom will help you deliver results that impress every time.
But beware! Fans crave the charm of amateur content, where authenticity holds immense value. Don’t overdo the edits—photos can quickly shift from looking polished to appearing fake, which could backfire and undermine your ultimate goal of connecting with your audience.
Did you enjoy the article? Got something on your mind? Join our Telegram group and connect with others who are just as into this as you are.
